Creating Perfect Seamless Loops in DaVinci Resolve for Long-Form Videos
Most long-form ambient videos rely on loops to extend runtime without exponentially increasing file sizes or production time. A three-minute sequence looped 200 times creates a ten-hour video—but only if the loop is truly seamless. A single visible jump, audio pop, or motion discontinuity ruins the immersive experience viewers expect from ambient content.
Creating perfect loops is both technical craft and artistic discipline. After producing dozens of multi-hour ambient videos, I have refined a workflow that ensures every loop point is invisible, whether the viewer watches for ten minutes or ten hours straight.
This article breaks down my complete loop creation process in DaVinci Resolve, from the initial 4-frame crossfade technique to advanced audio synchronization and quality testing methods.
Why Seamless Loops Are Critical for Ambient Content
Ambient music videos serve a specific purpose: creating uninterrupted atmospheres for focus, relaxation, or sleep. A jarring loop break destroys this purpose instantly. Viewers notice even subtle discontinuities—a sudden brightness shift, a motion stutter, or an audio click—and the spell is broken.
The challenge intensifies with long-form content. A loop that appears seamless during a quick preview might reveal flaws after the 50th repetition. Viewers who use ambient videos for extended work sessions or overnight sleep will encounter every loop point dozens of times. Perfection is not optional; it is the baseline expectation.
Beyond viewer experience, seamless loops enable creative flexibility. A well-crafted three-minute loop can extend to any duration without additional rendering or storage costs. This efficiency transforms production workflows, allowing rapid iteration and experimentation.
The 4-Frame Crossfade Technique: Foundation of Invisible Loops
The core of my loop workflow is a precise 4-frame crossfade transition at the loop point. This technique blends the end of the sequence with the beginning, creating a smooth visual transition that eliminates hard cuts.
Why 4 Frames?
At 24 frames per second, 4 frames equals approximately 167 milliseconds—just long enough to mask the transition without creating noticeable motion blur or ghosting. Shorter crossfades (1-2 frames) often fail to fully blend the images, leaving a perceptible flicker. Longer crossfades (8+ frames) introduce visible double-exposure effects, especially in scenes with movement.
Through extensive testing across different content types—static cityscapes, slow camera pans, particle effects—4 frames consistently delivers the best balance between invisibility and technical reliability.
Setting Up the Crossfade in DaVinci Resolve
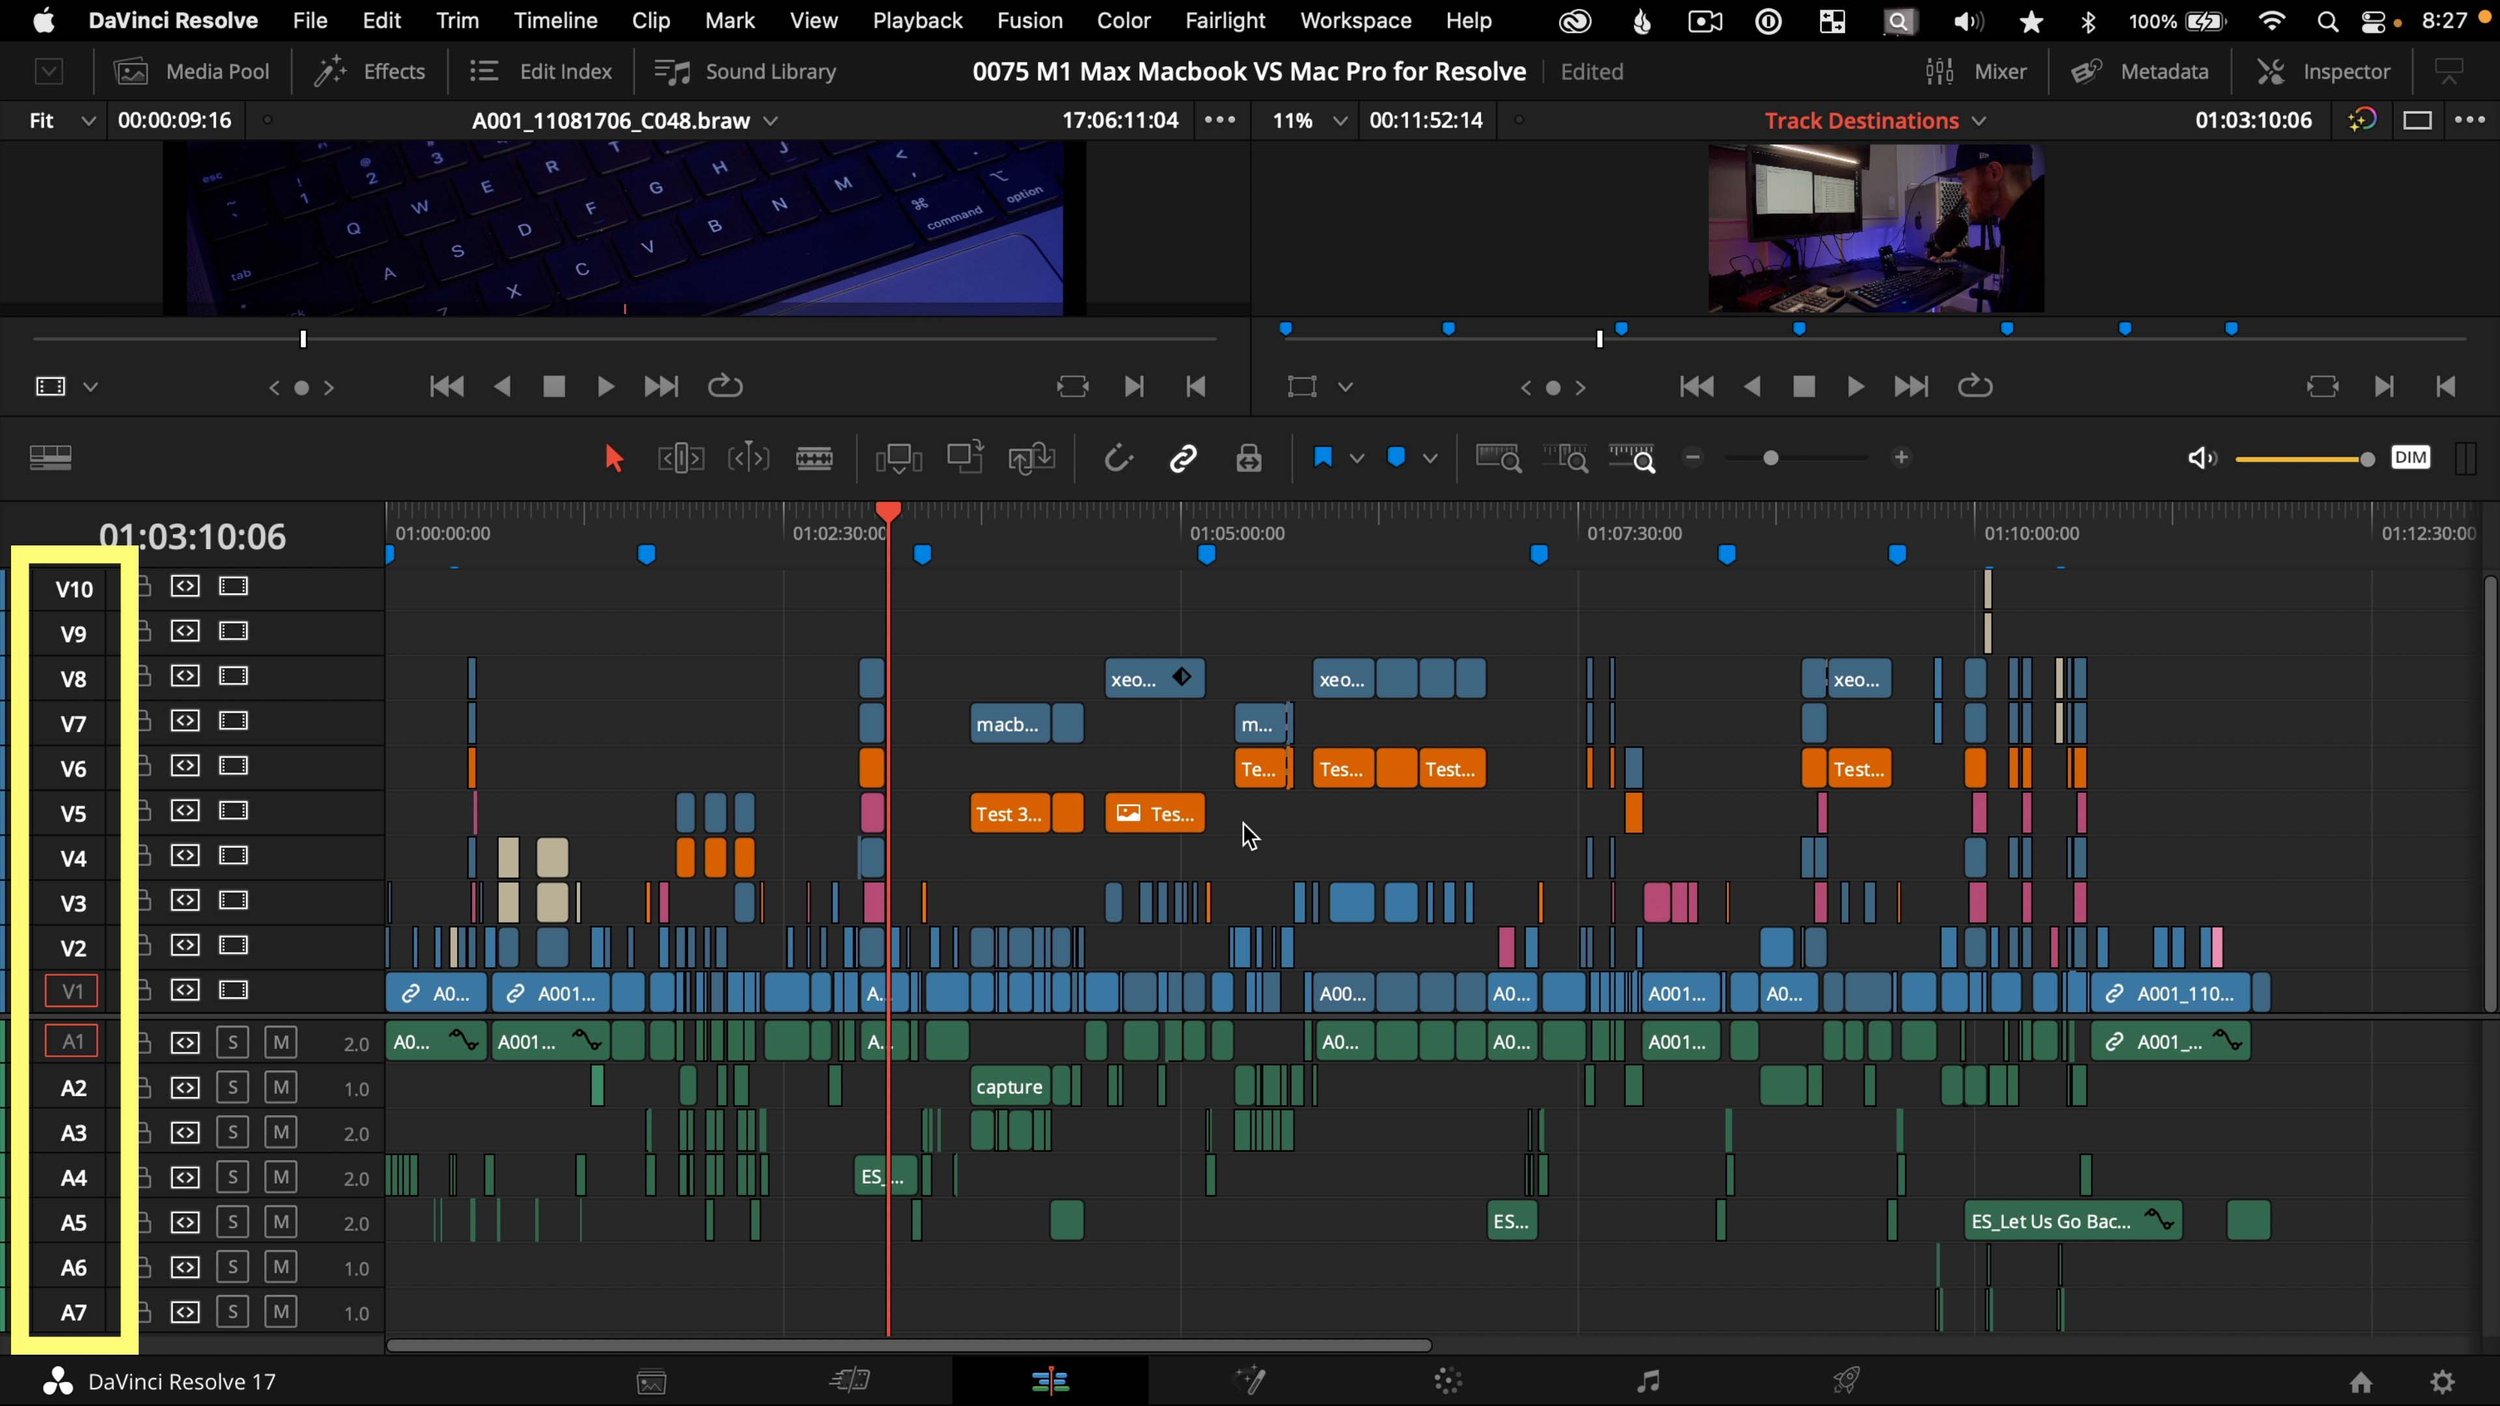
The process begins with timeline preparation. I arrange my base sequence on Video Track 1, ensuring the content is trimmed to the exact desired loop length (typically 2-3 minutes for ambient videos).
Next, I duplicate the entire sequence and place it on Video Track 2, directly above the original. The key is positioning: the duplicated sequence must start exactly 4 frames before the original sequence ends. This creates the overlap zone where the crossfade occurs.
In DaVinci Resolve's Edit page, I select the clip on Video Track 2 and apply a Cross Dissolve transition. The transition duration is set to exactly 4 frames. DaVinci Resolve automatically calculates the blend, creating a smooth fade from the outgoing frame (end of Track 1) to the incoming frame (beginning of Track 2).
The result is a seamless visual transition. When the timeline loops back to the start, the viewer sees a continuous flow rather than a hard cut.
Fine-Tuning the Crossfade
Not all content crossfades equally well. Scenes with rapid motion or high-contrast elements require additional adjustments.
For sequences with camera movement (pans, zooms, tilts), I ensure the motion speed is consistent at both the start and end of the loop. A pan that accelerates at the beginning but decelerates at the end will create a noticeable rhythm break at the loop point, even with a perfect crossfade. I adjust timing in the Edit page, using speed ramps or retiming curves to match motion profiles.
For high-contrast scenes (bright city lights against dark skies, for example), I sometimes add a subtle opacity ramp to the crossfade. Instead of a linear 0-100% fade, I use DaVinci Resolve's keyframe editor to create a slight ease-in/ease-out curve. This prevents abrupt brightness shifts that can occur when blending extreme luminance values.
Audio Synchronization: The Hidden Challenge
Visual loops are only half the equation. Audio must loop seamlessly as well, and this presents unique challenges. Unlike video, where a 4-frame crossfade masks transitions, audio requires sample-accurate alignment to avoid clicks, pops, or phase cancellation.
The Audio Click Problem
When an audio waveform loops, any discontinuity in amplitude creates an audible artifact. If the waveform ends at a positive peak and begins at a negative trough, the instant transition produces a sharp click—the audio equivalent of a visual jump cut.
This problem compounds in ambient music, where sustained tones and slow-evolving textures dominate. A click that might be masked in a busy rock song stands out starkly against a quiet drone or gentle piano melody.
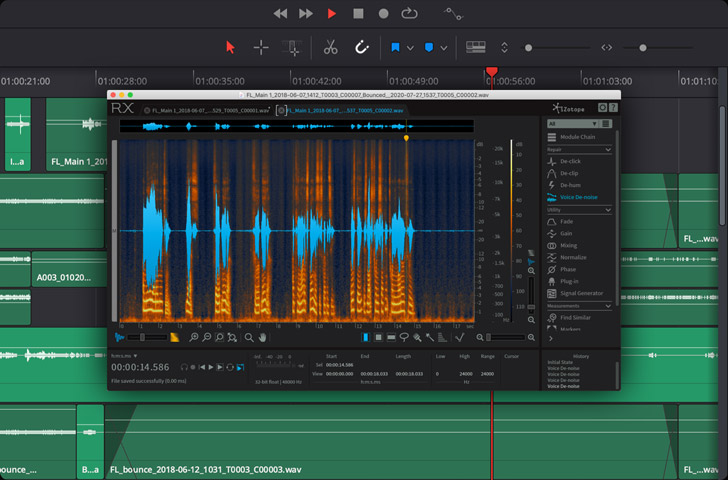
Zero-Crossing Alignment
The solution is zero-crossing alignment: ensuring the loop point occurs precisely where the audio waveform crosses the zero amplitude line. At this point, there is no voltage difference between the end and beginning of the loop, eliminating click artifacts.
In DaVinci Resolve's Fairlight page, I zoom into the waveform at maximum magnification (often 1:1 sample level). I identify the nearest zero-crossing point to my desired loop boundary and adjust the edit point to align exactly with that sample.
This process requires patience. For a 3-minute loop at 48kHz sample rate, there are 8,640,000 samples to consider. Finding the optimal zero-crossing often involves shifting the loop point by a few dozen samples (less than 1 millisecond) forward or backward.
Audio Crossfades for Complex Textures
Some ambient tracks feature such dense layering that finding a clean zero-crossing across all frequency ranges is impossible. In these cases, I apply a short audio crossfade (typically 10-20 milliseconds) at the loop point.
Unlike video crossfades, audio crossfades must be extremely brief to avoid phase cancellation. When two identical audio signals overlap with a time offset, certain frequencies cancel out, creating a hollow, filtered sound. A 10ms crossfade is short enough to minimize this effect while still smoothing over minor waveform discontinuities.
I apply the audio crossfade in Fairlight using the Crossfade tool, set to Equal Power mode. This ensures consistent perceived loudness across the transition, preventing volume dips that can occur with linear crossfades.
Testing Loops: The 2x Speed Playback Method
Creating a loop is one thing; verifying its seamlessness is another. Human perception is remarkably sensitive to repetition, and flaws that escape notice during editing often become glaring during extended playback.
My primary testing method is 2x speed playback. By doubling the playback rate in DaVinci Resolve, I compress a 3-minute loop into 90 seconds, allowing me to observe multiple loop cycles quickly. At this speed, any visual jump, brightness shift, or motion stutter becomes immediately obvious.
I watch at least 5-10 loop cycles at 2x speed, focusing on different aspects each time:
Cycle 1-2: Overall motion continuity. Does the camera movement flow smoothly, or is there a stutter at the loop point?
Cycle 3-4: Brightness and color consistency. Are there any sudden shifts in exposure or color temperature?
Cycle 5-6: Edge details. Do elements at the frame edges (buildings, trees, particles) maintain consistent positions, or do they "teleport" at the loop point?
Cycle 7-8: Audio sync. Does the music flow naturally, or are there clicks, pops, or rhythm breaks?
Cycle 9-10: Cumulative fatigue. After watching multiple cycles, does anything start to feel repetitive or jarring?
If any issue appears, I return to the Edit or Fairlight page, make adjustments, and re-test. This iterative process continues until the loop passes all criteria flawlessly.
Common Loop Mistakes and How to Avoid Them
Even experienced editors make loop errors. Here are the most frequent issues I have encountered and their solutions.
Mistake 1: Mismatched Start and End Frames
The most basic error is failing to ensure the first and last frames of the sequence are visually compatible. If the sequence begins with a bright sky and ends with a dark sky (due to a slow fade effect, for example), no crossfade will make the loop seamless.
Solution: Before creating the loop, scrub through the timeline and verify that the first and last frames could plausibly be adjacent in a continuous shot. If not, adjust the sequence length or trim the problematic sections.
Mistake 2: Ignoring Audio Phase
Visual editors often overlook audio phase relationships. When looping stereo audio, the left and right channels must align at the loop point. A zero-crossing in the left channel does not guarantee a zero-crossing in the right channel.
Solution: In Fairlight, view both stereo channels simultaneously. Find a zero-crossing point where both left and right waveforms cross zero within a few samples of each other. This ensures phase coherence across the stereo field.
Mistake 3: Inconsistent Motion Speed
Camera movements that accelerate or decelerate create rhythm patterns. If the loop point interrupts this rhythm, viewers perceive a "hiccup" even if the visual transition is smooth.
Solution: Use DaVinci Resolve's speed ramps to ensure motion speed at the loop point matches motion speed at the loop start. For complex camera moves, I sometimes extend the sequence slightly and trim to a point where motion naturally repeats.
Mistake 4: Forgetting to Test at Full Resolution
Loops that appear seamless in timeline preview (often at reduced resolution for performance) sometimes reveal flaws when rendered at full 4K quality. Compression artifacts, subtle color banding, or edge aliasing can emerge only in the final export.
Solution: Render a short test segment (30 seconds to 1 minute) at full export settings before committing to a 10-hour render. Play this test file in a media player, not in DaVinci Resolve's timeline, to see exactly what viewers will experience.
Mistake 5: Over-Reliance on Crossfades
Crossfades are powerful tools, but they are not magic. A poorly planned sequence with incompatible start and end content cannot be saved by a crossfade alone. The transition will simply be a blurry mess instead of a sharp jump.
Solution: Plan loops from the beginning. When shooting or composing source material, think about how the sequence will loop. Aim for circular motion patterns, gradual lighting changes, and audio textures that naturally cycle.
Advanced Loop Techniques for Complex Content
Basic crossfade loops work well for static or slow-moving scenes. More complex content—particle systems, multiple moving elements, layered audio—requires advanced techniques.
Nested Loops for Layered Content
For videos with multiple independent layers (background cityscape, foreground rain particles, overlay light effects), I create separate loops for each layer. Each layer loops at its own rate, creating variation without breaking seamlessness.
For example:
- Background cityscape: 3-minute loop
- Rain particles: 2-minute loop
- Light flares: 1.5-minute loop
Because these loop lengths are not multiples of each other, the overall composition does not repeat exactly until 6 minutes have elapsed (the least common multiple). This creates the illusion of continuous, non-repeating content even though each layer is looping.
I implement this in DaVinci Resolve by placing each layer on a separate video track and applying individual crossfades to each. The timeline length is set to the longest loop (3 minutes in this example), and shorter loops simply restart mid-timeline.
Audio Layering for Natural Variation
Similarly, I layer multiple audio loops at different lengths. A base ambient drone might loop every 3 minutes, while a secondary texture (distant traffic, bird calls, wind) loops every 2 minutes and 15 seconds. The interaction between these layers creates evolving soundscapes that feel organic rather than mechanical.
In Fairlight, I use separate audio tracks for each layer, applying zero-crossing alignment to each independently. The result is a rich, non-repetitive audio environment that supports extended listening.
Micro-Variations Within Loops
For the most demanding projects, I introduce subtle micro-variations within each loop cycle. This might involve slight color grading adjustments (a 1-2% brightness shift), minor speed ramps (0.5% speed variation), or audio filter sweeps (gentle EQ changes).
These variations are imperceptible on a single loop cycle but prevent the "frozen time" feeling that can occur after dozens of repetitions. The viewer's subconscious registers that something is subtly different each time, maintaining engagement without breaking immersion.
I apply these micro-variations using keyframes in the Color page (for visual changes) and automation curves in Fairlight (for audio changes). The key is subtlety—changes must be small enough to avoid conscious detection but large enough to register subliminally.
Workflow Summary: My Step-by-Step Loop Process
Here is my complete loop creation workflow, condensed into actionable steps:
-
Prepare the base sequence: Edit the content to the desired loop length (2-3 minutes). Ensure first and last frames are visually compatible.
-
Create video overlap: Duplicate the sequence to a second video track. Position it to start 4 frames before the original ends.
-
Apply 4-frame crossfade: Add a Cross Dissolve transition to the overlapping clip, set to exactly 4 frames.
-
Align audio to zero-crossing: In Fairlight, zoom to sample level and adjust the loop point to the nearest zero-crossing in all audio channels.
-
Apply audio crossfade (if needed): For dense audio, add a 10-20ms Equal Power crossfade.
-
Test at 2x speed: Play 5-10 loop cycles at double speed, checking motion, brightness, color, and audio.
-
Render test segment: Export 30-60 seconds at full quality. Play in external media player.
-
Iterate and refine: Fix any detected issues and re-test until flawless.
-
Extend to final duration: Once the loop is perfect, extend the timeline to the desired length (10 hours, for example) by repeating the looped sequence.
-
Final render: Export using optimized settings (H.265, 80 Mbps, 4K) as detailed in my rendering workflow article.
This process typically takes 1-2 hours for a 3-minute loop, but the result is a loop that can extend to any duration without quality degradation.
Conclusion: Loops as Creative Foundation
Seamless loops are not just a technical necessity for long-form content—they are a creative foundation. A well-crafted loop enables experimentation, iteration, and scalability that would be impossible with linear, non-looping workflows.
Mastering loop creation in DaVinci Resolve transforms the production process. Instead of rendering hours of unique content, I render minutes of perfect content and extend it infinitely. This efficiency unlocks creative freedom, allowing me to focus on quality rather than quantity.
The techniques in this article—4-frame crossfades, zero-crossing audio alignment, 2x speed testing, layered loops—represent years of refinement. They work across content types, from static cityscapes to complex particle systems, and they scale from 10-minute videos to 10-hour marathons.
The next time you watch a 10-hour ambient video and wonder how it maintains such consistent quality throughout, the answer is simple: perfect loops, executed with precision.
TAGS
Share this article